I bought this funky mask, made from some synthetic leathery product, about 20 years ago. I've used it as a mad cow ("moo, dammit") with white tee & pants with spots tacked on, or with street clothes on lazy Halloweens when I had to have something. It occurred to me, since it's trashed, to make another, and that there are limitless possibilities of design here. So I've recreated it. You can use any design you can google, get inspiration from, or come up with on your own. You are free to copy mine, just not for sale, of course.
Please let me know if these instructions are confusing, this is my first tutorial!
I'd say this is an intermediate job, leather sewing experience helps because of it's stretchiness, or heck, even use a mini glue gun for the smallest beads possible. I worked on this over 2 days. Read through all instructions first! This is a grown up mask, but for a kid you can trace a kid's size plastic mask!
**I highly recommend a teflon presser foot when sewing leather, which STICKS to metal ones. If you have paper tape that may help by taping the bottom of your metal presser foot. TEST it first. Also, a size 11 or 14 machine needle is fine for garment weight leather, a leather needle makes too large a hole, leather does not forgive holes, it's best to sew once, twice if you can hit the same holes the second time. I've developed a knack for being able to use the same holes.
All seams are exposed., except where the snout meets the face. It's stuffed slightly to give it stiffness. I used llama roving, you can use cotton balls, synthetic batting, geez, even scrap rag strips. Whatever you can stuff inside, you won't be machine washing it if you use leather.
Which brings me to materials. I used scraps of garment weight leather from skirts, jackets. I imagine even fabric would be fine, it's a mask, not a ball gown (you can pre-seam the edges to prevent fraying). The original mask used felt as horns, ear trim and whiskers. Some ideas...moleskin, vinyl, mix and match. Faux suede, denim, even recycled plastic wrappers, think outside the box! Anything you can sew or glue. Make a trash mask!
Here's my old mask, has seen better days.
You will need: face color; horn, ear trim, nostril and whisker color; eye band color. I used cream, red and black leather. If you are picky like me, have the matching thread on hand. 14" elastic will hold the mask on your face...
I roughly sketched the outside shape of the face and snout. (You can make a pattern by measuring your face from ear to ear, then close to the top of your forehead down to about the bottom of your mouth.) Then I cut the face and snout separately. I retraced the snout and made a mark at the point where the face and snout meet on each side. I added an additional width of about 1/4" on the top half of the snout on the sides (not on the top of the snout) above those marks (you'll see a point where the pattern juts out at the top half, this will be the point where you sew one snout piece to the top half of each face piece.
I drew & cut two vertical 1/4" V's for darts at the top, to give the snout some "pop-out" dimension. See picture below. You can see where the top half of the snout is wider than the space it fits in.
 I then traced the horns and ears, adding an additional 1/4" at the ends where they meet the face, so you can tuck them into the two face pieces (you will cut 2 of all pieces, 4 for the ears and snout).
 Don't forget **trace the 2 "whiskers" and the additional trim pieces at the bottom 1/3rd of the ears for the second ear color**.
 Out of the second color, cut 4 horns; draw 2, flip draw 2. I used the original mask to guide in freehand drawing them, on the back of the leather, you can make your mistakes drawing before you cut. Be careful when you draw on the whiskers, the back will show. Cut inside the line.
Out of the first color, cut 2 face pieces (flip to draw the second one on these, trust me, both sides are rarely the same). Don't cut the eye holes out yet!!
2 snout pieces (flip as well)
4 ear pieces (draw 2, flip, draw 2)
 Out of the second color, cut 4 horns; draw 2, flip draw 2. I used the original mask to guide in freehand drawing them, on the back of the leather, you can make your mistakes drawing before you cut. Be careful when you draw on the whiskers, the back will show. Cut inside the line.
Cut 2 whiskers, (draw, flip, draw).
Cut 2 trim pieces for the ears (draw, flip, draw).
Cut two nostrils, I free hand drew them on the leather.
 I traced the eye holes from the original mask, made the holes slightly bigger, or for your purposes, measure your face from outside one eye to the outside of the other. Then I freehand drew the rest. This will be a trial and error, you could use your sunglasses laid over the ovals you draw to make sure the holes will fit your eyes. Once you cut this pattern part you can lay it over your eyes to fit. Better to screw it up on paper first, so don't hesitate to do it twice. I redesigned the flairs slightly, this is the creative part.
I always have a hard time drawing on black leather, I used a white colored pencil, you can use a fabric pencil, gel pen, whatever you find makes a sharp line.
 Cutting this ended up being easiest with embroidery scissors, the knife made it drag.
 Remember, it's your mask, leather in out leather out, make it your own!
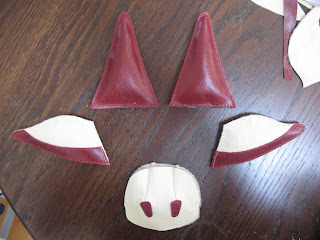
 Here's all the pieces cut and laid out how they will look. I actually sewed the whiskers suede side out, because they droop and flip over, so on the finished mask the leather shows.
I sewed the eye piece on first. I ALWAYS glue stick or spray mount (LIGHTLY) the leather on leather when I sew it, it's slippy and you can't pin it. I keep a medium-large box handy for spraying in. 1/16" seam allowance is fine on leather or non fraying material.
 Sew the nostrils on one piece of the snout. It's upside down in the pic, so look before you sew! the wide part of the nostril is on top. Fold the leather at the darts you cut, right sides in. Seam close, 1/16th" is fine for leather or any non fraying material.
  Sew two horn pieces to two back pieces, seams out, right sides out.
 Sew a TRIM to each front of TWO ear pieces, then sew a front ear piece to each back piece, right sides out.
Stuff the horns and ears lightly and tack them shut with a long stitch.
Line up the front snout piece (with the nostrils) right sides together, at the bottom of the face and the point where you made the snout wider. Leather is both hard because it is slippy, so go slow, and easy because you can stretch and manipulate it as it goes through.
 I actually started about 1/2" above the point where the two pieces meet. This is so I can put the whiskers in later without wrestling the pieces to the ground in a WWF style smack down. About where the tip of my finger is in the pic above. Sew slowwwwwly around the snout, you have to constantly readjust by lifting the presser foot and turning slightly. Have faith, it'll be round when you're done.
 Now, slide a whisker in one side, with right sides of whisker and snout together like the pic above. I cheated and put a TEENY line of superglue at the very end of the whiskers, held in place and let it dry on each side. Finish the seams of the snout. When you sew leather or vinyl, you can stretch one side to make it line up. If you have an overlap at the end, fudge it, really, it's a mask and it won't show, mine didn't line up perfectly when it was done, I ended up trimming the mask where it met the snout. *shrugs*
Now do the other side of the snout, and then repeat for the back face and snout piece. You won't have to worry about the whiskers so go from end to end, looking forward constantly to make sure the other end will line up.
Ok, here's where you get to put the front to the back.
Mark the point where you want the ears to go (mark top and bottom of the ear) on the very edge of the back face piece so your ears will be even (keep referring to the pic for position). I am pretty advanced, so I don't use points of reference like on patterns, but always keep my eyes forward to see if I'm going to line up later.
NOW is the time to cut your elastic, wrap a piece around the back of your head to the front of your ears, stretch some, and cut. You will slide one end behind each ear piece as you sew the pieces together, about halfway down the height of the ear. Or you can superglue the elastic to the BACK face piece about 1/4" in, on the first side, right in (I did this).
NOW is the time to cut your elastic, wrap a piece around the back of your head to the front of your ears, stretch some, and cut. You will slide one end behind each ear piece as you sew the pieces together, about halfway down the height of the ear. Or you can superglue the elastic to the BACK face piece about 1/4" in, on the first side, right in (I did this).
Start at the corner where the snout meets the face. DON'T sew the bottom half of the snout shut yet. When you get near your ear mark slide one ear in about 1/4". You CAN cheat and superglue the ears onto the front of the mask. You can do this with the horns too! I did.
When you get to the other ear, you can slide the other end of the elastic behind that ear (about halfway down the ear as well).
Stuff a piece of roving up top above the eyes after you get around the top to make stuffing easier later.
Sew around the eye holes after you sew the top half, before you stuff the rest of the face.
 Once you've sewn from snout to snout, you can stuff the rest of the mask, not too much. I put very little between the eyes. Sew it shut!
 NOW cut the eye holes. Make a starter hole with a knife or rotary cutter. Then carefully trim around using the eye piece as a guide.
This pic shows both masks, As you can see, my method is kind of fly-by-the-seat-of-your-pants. For an experienced seamstress, not an unusual method. Had I had more time and knowledge of PDF I would have provided a pattern, my apologies!
 If any of my instructions are unclear PLEASE email me at ka_boogie@sbcglobal.net and I'll be happy to walk you through it. This is my first real tutorial so I hope it's clear and well layed out. Thanks for reading, would love to see any that are done!
 If any of my instructions are unclear PLEASE email me at ka_boogie@sbcglobal.net and I'll be happy to walk you through it. This is my first real tutorial so I hope it's clear and well layed out. Thanks for reading, would love to see any that are done!
Have a ball!


No comments:
Post a Comment